The Ultimate Toolbox for creating
amazing web sites!
Now let's see how you can build these effects into your web page:
Step 1
Download the scripts from the http://script.aculo.us/ website.
Step 2
Unzip the files to a folder of your choice. For example: c:\scriptaculous
Step 3
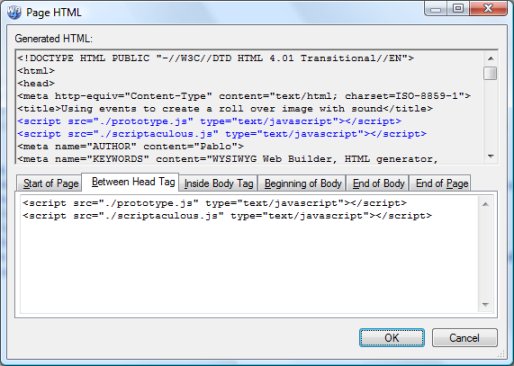
In the Web Builder menu click Page->Page HTML and select Between Head Tag.
Step 1
Download the scripts from the http://script.aculo.us/ website.
Step 2
Unzip the files to a folder of your choice. For example: c:\scriptaculous
Step 3
In the Web Builder menu click Page->Page HTML and select Between Head Tag.
Adding cool image effects using the Script.aculo.us Javascripts
This tutorial shows you how to add cool effects to your images using the JavaScript libraries of http://script.aculo.us/. Script.aculo.us provides you with easy-to-use, cross-browser user interface JavaScript libraries to make your web sites and web applications fly!
Click one of the buttons to see a demonstration of the effect. These are just a few of the available effects. Click the Reset button to reset the image to its original state.
Step 4
Copy/paste this code:
<script src="./prototype.js" type="text/javascript"></script>
<script src="./scriptaculous.js" type="text/javascript"></script>
Step 5
Insert a File Publisher object (Insert->Advanced->File Publisher) and add these files:
c:\scriptaculous\lib\prototype.js
c:\scriptaculous\src\builder.js
c:\scriptaculous\src\controls.js
c:\scriptaculous\src\dragdrop.js
c:\scriptaculous\src\effects.js
c:\scriptaculous\src\scriptaculous.js
c:\scriptaculous\src\slider.js
c:\scriptaculous\src\unittest.js
Step 6
Insert an image to your page (Menu->Insert->Image) and pay special attention to its ID in the Properties Inspector window.
Step 7
In this example we're going to use an Advanced button to trigger the image effect.
Click Menu->Insert->Form->Advanced Button to add a new button to your page.
Step 8
Open the properties of the Advanced button and set these properties:
Button type: OnClick
OnClick action: Execute Javascript function
Set the OnClick value to one of the following values (depending on the type of effect you want):
new Effect.Appear('Image4'); return false;
new Effect.Fade('Image4'); return false;
new Effect.Puff('Image4');return false;
new Effect.Grow('Image4'); return false;
new Effect.Shrink('Image4'); return false;
new Effect.Scale('Image4',150,{scaleX: true, scaleY: true}); return false;
new Effect.Scale('Image4',20,{scaleX: true, scaleY: true}); return false;
new Effect.BlindUp('Image4'); return false;
new Effect.BlindDown('Image4'); return false;
new Effect.DropOut('Image4');return false;
new Effect.SwitchOff('Image4');return false;
new Effect.Pulsate('Image4');return false;
new Effect.Fold('Image4');return false;
new Effect.Shake('Image4');return false;
new Effect.Squish('Image4');return false;
Note:
You can also trigger these effects using the events of images, shapes and form controls.
Just set the event action to 'Javascript function' and use the same code as shown above.
Related tutorial:
Using events to create a roll over image with sound
You can also trigger these effects using the events of images, shapes and form controls.
Just set the event action to 'Javascript function' and use the same code as shown above.
Related tutorial:
Using events to create a roll over image with sound